Baby Strawberry Cream Scones!

Hello friends! Spring feels within reach here in Boston. How can I tell? I have a congested nose, and I dart nervously away from all beautiful blooms I come across! I also live in fear of the fierce winds here. Allergy sarcasm aside, one thing I am loving about spring is being able to actually enjoy going to Haymarket on the weekends and see what’s new in produce each week. I like Haymarket, because it’s super cheap, and I kind of get a thrill out of amazing bargains, especially food! Strawberries are always a steal at Haymarket (until this past weekend– $2 a box, humph), either $1 a box or 2 for $3, albeit a little on the riper side. Last week, I scooped up two cartons to make Joy the Baker’s Tiny Strawberry Cream Scones. Hilariously enough, the pint of cream I had to purchase for the scones cost more than the strawberries themselves!

The recipe is super easy, and the results are impressive! Think English tea time impressive. I took most of them to the office at the risk of me eating them all if I kept them for myself at home, and they were gone by the end of the day :D . The strawberry flavour isn’t super pronounced, and the crumb of the scone is so amazingly tender!! It makes me want to explore making biscuits made from cream instead of my tried and true cutting butter into flour + buttermilk method. Below is the recipe (followed it to a T) and pictures for your visual pleasure! Hm. That last part was weird. Whatever.

Close up of these beauties.HOLY MOLY.


Baby Strawberry Cream Scones (makes about 20 to 24 small scones)
From Joy the Baker, who adapted the recipe from King Arthur Flour; original link HERE!

  • 3 cups all-purpose flour
  • 1 tablespoon baking powder
  • 1 teaspoon salt
  • 1/3 cup granulated sugar
  • 1 teaspoon pure vanilla extract
  • 1 1/3 to 1 1/2 cups heavy cream plus more for brushing the top
  • 3/4 cup coarsely chopped fresh strawberries … I got a little carried away and used 1 cup-ish. Sorry, not sorry.
  • 1/3 cup chopped white chocolate (optional) … I didn’t have white chocolate laying around for this. THANK GOD.
  • turbinado sugar for topping… I used plain white sugar, because I’m not at a fancy enough stage in my life yet.

Place a rack in the upper third of the oven and preheat oven to 425 degrees F.  Line a baking sheet with a Silpat or parchment paper and set aside.

In a medium bowl, whisk together flour, backing powder, salt, and sugar.  Set aside.

In a liquid measuring cup mix together vanilla extract and 1 1/3 cups cream. Drizzle the cream mixture into the dry ingredients tossing and stirring as you pour in the cream.  Add the strawberry chunks and white chocolate chunks (if using).  Toss together.  Add 2 more tablespoons of cream if necessary to create a moist, cohesive, but not sticky dough.

Dump the dough onto a lightly floured work surface.  Gently gather and knead the dough into a dish and press the disk out into a 3/4″-thickness.

Use a small biscuit cutter to cut small 1 1/4-inch circles from the dough disk.  Brush each circle with heave cream and sprinkle generously with turbinado sugar.

Place 1-inch apart on the prepared baking sheet and bake for 12 to 14 minutes or until golden brown and cooked through.

Remove from the oven and serve warm.


I got adventurous and cut the scones using both the scalloped and rounded side. The scallops stayed throughout baking and is my personal preference!

Cut and ready for the oven!

Fresh from the oven and ready to be devoured. You all should bake these for the scent alone. Getting to devour them is like a consolation prize. Just kidding! The eating part is super important! They aren’t real pretty as my oven is a little temperamental, but I’ll take it!

Golden brown and done.

That moment when your girl crush, Joy the Baker tweets at you! WHOA. Life made!

AH!

Waste not, want not | Buttermilk Raspberry Sandwich Cake

And October is upon us… But wait, I’m still daydreaming about cooler weather and fire-coloured foliage, because in my part of the country, it’s still summertime. Pumpkin everything has popped up, but you could feed me strawberries and watermelon and fool me! This year is flying by frighteningly fast, and we’re inching towards the gluttonous months at full speed! Therefore, it seems appropriate to start October off with a recipe post.

Growing up, I’ve always been taught never to waste food. Whenever I told my mom or aunt I was full or finished eating but had scraps of food left over, I would always be reminded that children in Africa were starving and that I should clean my plate. Hilariously, my African friends tell me that the same tactic was utilized by their parents but replaced with Asian children. So it’s always been ingrained in my head that wasting food (or things of any sort) is pretty high on the shelf of “qualities of a bad person,” at least for Asian people. As a kid, I always watched my aunt cook and bake, and she would always repurpose leftovers into another dish for the following dinner. In that sense, I like to think that I’ve taken on that inventive/frugal side of her for finding ways to stretch meals without making them boring and repetitive.

This leads into the trouble I have with buttermilk. As a 22 year old, I’m not really one to be waking up at the crack of dawn to make fresh biscuits every morning for my family, so I usually have a pretty full bottle of buttermilk after using the 1/4 cup needed for the recipe I bought it for. Since it’s dairy, it definitely doesn’t last forever, so I’ve found out via food forums that it freezes fine, which solves basically all issues that I have with buttermilk and my frugality! Yippee! However, knowing that I can’t just make biscuits and strawberry cake out of buttermilk (although both are heavenly, esp. the biscuits) I decided one day to Google “buttermilk cake” and looked for the simplest recipe out there. And I stumbled along Kitchen Trial and Error’s adaptation of a Joy the Baker recipe. I’ve made it once before, and I made it again tonight. It’s a seriously simple and basic cake to make and a must have in one’s repertoire. This cake is dense, rich, and moist, and the top crust bakes up to a slight caramelized crunch that my sister said reminds her of candy. For my version, I decided to slice my cake in half and sandwich raspberry jam in between. The tartness of the raspberry jam works to cut the sweetness in the cake. It’s simply bliss, you guys!!!! I had to refrain from doubling the recipe and making a full on layer cake out of this recipe. Now that I think of it, this recipe would honestly make for a great yellow layer cake recipe with its dense crumb… {Recipe below…}

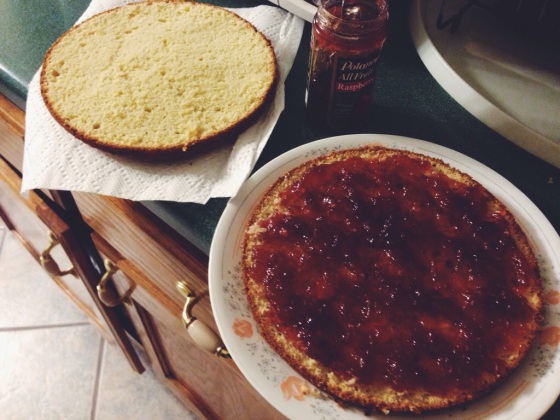
20131006-004906.jpg There’s something crazy relaxing about spreading the jam onto the cake.

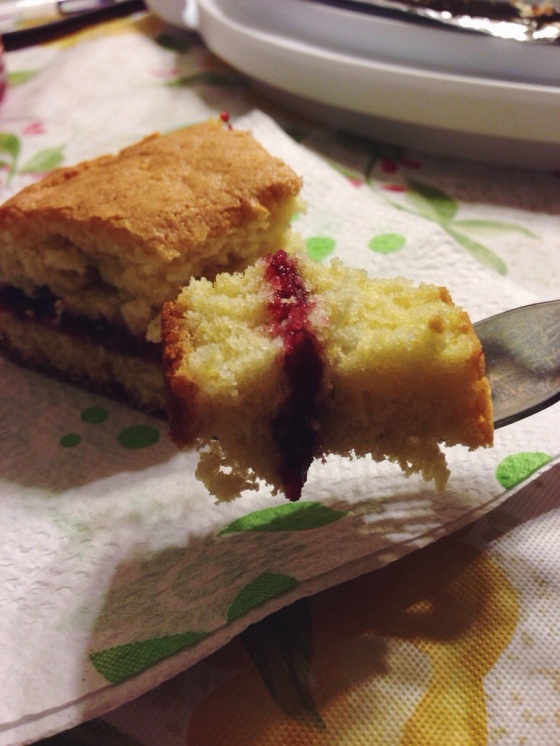
20131006-010153.jpg I’m drooling at the fact that this cake is even better after sitting for a while, because the jam seeps into the cake itself a little. Fireworks in yo mouth.

Buttermilk Raspberry Sandwich Cake                                            
INGREDIENTS:
1 1/2 cups flour
1/4 tsp baking powder
1/4 tsp baking soda
3/4 tsp salt
6 tbs unsalted butter, room temperature
1 cup sugar
1 egg + 1 egg yolk
2 tsp vanilla extract
1/4 cup buttermilk
PROCEDURE… adapted from Kitchen Trial and Error:
1. Preheat your oven to 375°F. Grease the bottom and sides of an 8″ round cake pan and set aside. {I used an 8″ cake pan and liked the resulting thickness of the cake; it was perfect for cutting in half and sandwich jam in between.}
2. In a medium bowl, whisk the flour, baking powder, baking soda, and salt and set aside.
3. In a separate bowl, beat the butter and sugar until creamy and light in color (The butter adn sugar don’t necessarily get creamy as it would for cookies– it’s more like a smooth, sandy texture). Add egg, yolk, and vanilla and mix until mixture is smooth and combined.
4. Add half of the flour mixture and mix until almost incorporated. Add the buttermilk and mix until almost incorporated. Add the remaining flour and mix until incorporated.
5. Spoon the batter into the prepared pan and smooth out so it’s even. Bake for approx. 30 minutes, or until a skewer comes out clean.
6. Let cake cool until warm too the touch and turn it out onto a plate or cake dish. Take a serrated knife and cut the cake in half horizontally.
7. Take jam of choice (in my case, raspberry) and generously spread onto the warm cake. Having your cake warm is important because the warmth kind of melts the jam, making the spreading an even layer easy-peasy. No need to warm jam in a pan and creating an extra dish to wash!
8. Pop top layer back on and it’s ready to eat! To get fancy, sift some powder sugar on this sucker after it’s cooled down!